Filter by Client and Interest Tags
When you have 10's or 100's of clients established in RxPhoto, your client list will be too long for you to manually search for a particular subset of clients. For example, maybe you want to see a list of all of your clients who have had a particular treatment, or you want to see a list of all of your clients who have signed consent forms. You can do so by filtering by tags. This is one reason why tagging your clients can be helpful in the future. You can also filter your client list by more than one variable. For instance, maybe you want to see only your clients who have had Botox
and
signed a consent form. You can do that! There is no limit to how many tags you can use to filter your client list.
This article will show step-by-step instructions on how to filter the client list using Client Tags and Interest Tags. For how to add tags to a client record, see
"
"Add and Remove Client Tags and Interest Tags"
For how to customize tags, see
"Customize Client Tags and Interest Tags,"
As you go through this article, you may expand the screenshots by clicking on the image you would like to expand.
Choose Filters
Follow these steps to filter out your clients. You will see that in this example, two Client Tags as well as two Interest Tags were chosen. However, you may filter by as many or few Client and/or Interest Tags as you would like.
Client Tags
1. From your client list, press on "All Clients" at the top of the screen.
2. Press on either Client Tags. (If you only want to filter by Interest Tags, skip to "Interest Tags" from the Table of Contents above.)
3. Choose the Client Tags you would like to filter by. Then press "Done." In this example, you will see that "Botox" and "Signed Consent Form" were chosen. Chosen tags are denoted by a blue check mark on the right side of the tag.
Interest Tags
4. Press on "Interest Tags" to also add Interest Tags. (If you only want to filter by any Client Tags, skip to step 6.)
5. Choose the Interest Tags you would like to filter by. Then press "Done." In this example, you will see that "Crows Feet" and "Anti-Aging" were chosen. Chosen tags are denoted by a blue check mark on the right side of the tag.
Apply Chosen Filters
6. Press "Apply" to apply the chosen filters.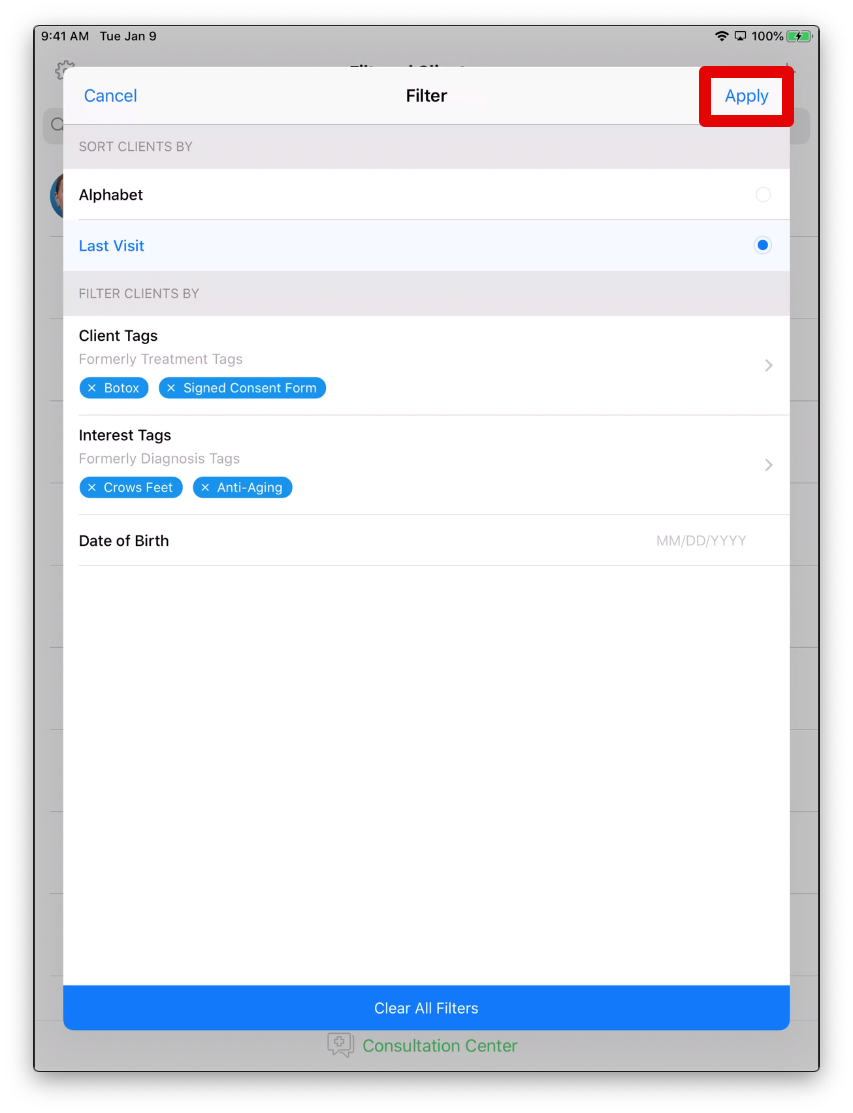 7. The client list will now display only clients that have been tagged by your chosen filters. For instance, the screenshot below shows only clients that have been tagged with both "Crow's Feet" and "Anti-Aging" tags.
Clear Filters
You may clear all your filters so that you see all of your clients in your clients list, or you may clear specific tags to broaden your filter. See the appropriate section below.
Clear All Filters
If you would like to clear your filters so that you see all of your clients in your client list again, you may do so by following the steps below:
1. Press on "Filtered Clients" at the top of the screen.
2. Press "Clear All Filters" at the bottom of the screen.
3. Confirm in the pop-up by pressing "Yes,' then press "Apply" and you will be taken back to your full patient list.
Clear Specific Filters
If you would like to clear only some of your chosen filters, but not all of them, you may do so by following the steps below:
1. Press "Filtered Clients" at the top of the screen.
2. If you would like to remove one or more Client Tags, press on "Client Tags" (to remove one or more Interest Tags, press on "Interest Tags.")
3. Press on the tag that you would like to remove. Then press "Done." In the example, "Signed Consent Form" has been removed. Note that the tag is no longer blue, and the blue check mark has been removed.
4. Once you are finished removing the Client and/or Interest Tags, you will see the remaining tags on the Filter screen. In the screenshot below, "Signed Consent Form" was removed from the Client Tags, leaving only "Botox."
5. When you are happy with the chosen Client and/or Interest Tags, press "Apply" and you will see only your clients with the respective Client and/or Interest tags.
Summary
When filtering clients, you may:
-
Filter by as many Client Tags as you would like.
-
Filter by as many Interest Tags as you would like.
-
Filter by
both
Client Tags and Interest Tags simultaneously.
-
Remove individual filter.
-
Clear all filters at once.
Remember that you must add tags to your clients record in order to be able to apply these filters. For example, if John Doe has been tagged under "Botox," he will show up if you choose to filter "Botox." If, however, he had Botox, but the tag was not added, he will not show up when you choose to filter, "Botox."
Because tags are fully customizable in RxPhoto, you will be able to create tags that you may want to filter by in the future. This way, you may use filters to find a particular subset of clients, making it easier to find exactly what and who you are looking for!
Related Articles
Add and Remove Client Tags and Interest Tags
Client Tags and Interest Tags are a great way to help organize your clients. Because tags are fully customizable on the RxPhoto Website (see "Customize Client Tags and Interest Tags" for details), you can use them in any way you like. Some ...Customize Client Tags and Interest Tags
View and Manage Tags - Website
On the RxPhoto website, you can add tags to the client's record as well. Go to their record and across the top you'll see interest tags and client tags. Click the plus button next to either and the edit patient screen will display along with the ...Reviewing Uploaded Photos
For the Doctor The doctor can review client uploaded photos by going to the client's record. At the bottom of their face sheet tap Enter Client’s Record. Then tap the Photos tab at the bottom of the screen. The client’s photos are labeled Client ...RxPortal - The Client's App
For the Client See the highlights of how to use the RxPortal App for both iOS and Android.