Navigate the Capture Screen
The capture screen is your starting point for capturing photos of the client, writing notes, signing forms, and accessing all data on a particular client. Navigate to a client's capture screen from the client list by pressing on a client's name.
This article will highlight each of the major features on the client's capture screen.
iPad
iPhone
As you go through this article, you may expand the screenshots by clicking on the image you would like to expand.
Capture Screen Appearance:
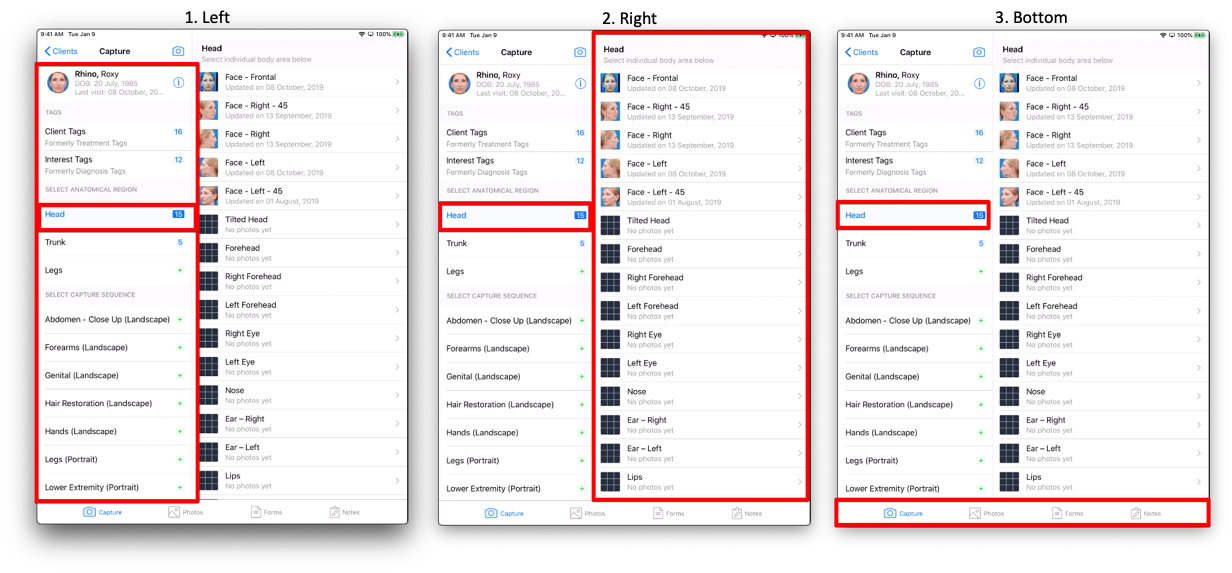
When you press on a client's name from the client list, you are brought to their Capture Screen:
- The left side of the capture screen is where you will find all possible actions . For instance, viewing/adding/removing client and interest tags (See "Add and Remove Client Tags and Interest Tags" for details) as well as all capture sequences that act as workflows for your staff to choose from.
- The right side of the capture screen is where you will select and capture a photo for a particular anatomical region (selected on the left). For instance, in the example below, "head" was selected (denoted by blue), and all the areas of the head are displayed on the right.
- On the bottom of the capture screen, the navigation bar allows you to view items in the client record, which includes their photos, forms, and notes.
Below, each of these three sections is broken down into its pieces to who you where to find various items.
On The Left - Select Action
As noted above, on the lefthand side of the capture screen is where you will find all possible actions. Here is a list of those actions:
- View/Edit Client Information
- View Head Photo Sequence
- View Trunk Photo Sequence
- View Legs Photo Sequence
- View Custom Photo Sequences
View/Edit Client Information
To view or edit the Client Information on this particular client, press on the info icon next to their name. A pop-up window will appear with their information:
To edit Client Information, press on the field you would like to edit and the iPad keyboard will pop up. Once you have finished editing, press "Done" on the top right of the pop-up window.
View Head/Trunk/Leg Photo Sequences
Below the TAGS section, you will find the SELECT ANATOMICAL REGION section, where you can view sequences for the head, trunk, and legs.Press on the anatomical area to select, and the sequence will appear on the right side of the screen. For instance, in the screenshot below, the "Trunk" region was selected, and you may see the sequence of trunk photos on the right:
The same goes for "Head" and "Legs."
View Custom Photo Sequences
You may view custom photo sequences in the same way as viewing head, trunk, and legs.Scroll down until you see the photo sequence you would like to use, and press to select.For instance, in the screen show below, "Trunk "Portrait)" was selected.Note: the name of the custom sequences RxPhoto has provided for you (all of which have on-screen guides) tells you whether to hold your iPhone/iPhone vertically (portrait) or horizontally (landscape.)
On The Right - Select and Capture Photos
Select the photo you would like to take on the right side of the screen. You may start at the beginning of a sequence, or capture a photo of any of the areas displayed.
Press to select the area you would like to take a photo of to view the on-screen guide. (Note: there are not on-screen guides for anatomical areas that you create yourself.) In the screenshots below, "Face - Frontal" was selected:
On The Bottom - Navigation Bar
All of the above, including all actions, selecting anatomical regions, and selecting which photos to capture has taken place under the "Capture" tab on the bottom of the screen.
On the bottom of the screen the navigation bar has tabs for "Photos," "Forms," and "Notes." Press on these tabs, to go to the Photos Screen, Forms Screen, or Notes Screen appropriately.
For more information on Photos, Forms, and Notes,, please see the related articles listed below.
Summary
The Capture Screen is broken down into actions that you may selecton the left side of the screen, and the photos templates and sequences to select from on the right side of the screen. Actions include things such as selecting a body area to capture photos, viewing and editing client information, and adding or deleting Client Tags or Interest Tags.
Related Articles
Resolve Capture Screen Freezing on iPhone
iPhone 12 Pros running iOS 15.0 or higher may experience a problem with the capture screen freezing upon opening on-screen guides and attempting to capture a photo. While the RxPhoto team works toward a solution, there are two options to resolve the ...New! Upgraded Capture Sequences
The upgraded RxPhoto Custom Capture Sequences allow practice to create Custom Capture Sequences using any of RxPhoto's on-screen guides. With the update, practices can create Custom Capture Sequences with more specificity. For example: Botox (with ...Customize Capture Sequences
The upgraded RxPhoto Custom Capture Sequences allow practice to create Custom Capture Sequences using any of RxPhoto's on-screen guides. With the update, practices can create Custom Capture Sequences with more specificity. For example: Botox (with ...Photo Ghost from the Photos Screen
You can choose any 'before' photo to use when ghosting to capture an 'after' photo. Select the photo you want to use, then tap the ellipsis at the top right of the screen and choose Ghost. This will take you to the ghosting screen in the capture ...On-screen Guide Tools for the iPhone
Watch the video below to learn about the tools available to use with the RxPhoto on-screen guides on the iPhone. Please not that the same options are available on the iPad, but the layout of the tools is slightly different. Please see "On-screen ...